Pages

Thursday, April 16, 2015

Oracle Data Integrator for beginners Part 1

 Oracle Data Integrator for beginners Part 1

 I will share my knowledge of ODI with this post by listing some key points about this application.

 From this series of post, you can expect some good information and I will try not to put unnecessary content which most of the people don't like to read also.

 I will start the first post with basic information.

 Basics of Oracle Data Integrator

-  "Oracle Data Integrator" is an application from Oracle corporation often called as "ODI". (People who works in Oracle Data warehouse technology, they always call this application with simple short name "ODI").

- This product is initially developed by  "Sunopsis" company and later it was acquired by Oracle corporation.

- ODI is a data integration tool and comprises E L T architecture.The characters or individual letters have the below full forms.

    E           Extraction
    L           Loading
    T          Transformation 

- If you consider Informatica(Another power leading data integration tool), it works with ETL architecture.

Informatica Logical ETL architecture:
Typical ETL architecture

- There are some disadvantages with this type of architecture.

  •  Nowadays almost every database is designed with inbuilt algorithm to perform these type of calculation efficiently. So we are missing the usage of this feature with this architecture.
  •  Proprietary engine needs additional hardware device(mostly) to participate in data loading.( Highlighted in blue color area in the above image)
  • Data moved from source DB to "ETL engine" and then to Target DB. Unnecessary data movement is happening in this case.
  •  
- In order to overcome this disadvantages, Oracle came with new architecture that is E L T.

- In a simple statement, Informatica is an ETL tool while ODI is E-LT tool.

- So almost whatever you can do in Informatica, you can accomplish the same(more or less) with ODI.

ODI Logical E-LT architecture:


ODI E-LT logical architecture
- If you observe the above image, there is no holding of data before loading it to the Target database. Everything is initially moved to Target database directly.

- Then based on business requirements, we will apply business rules to transform the data. 

- After loading the data into some temporary tables in Target database, ODI takes the advantage of database feature to transforming the data.

- Try to understand a small example which relates ODI loading feature.

  You have a table in Database A. You want to load it to Database B. Practically, it takes some time to do it. 
  But if you want to load the table data to another table within the database, obviously it takes little time when compare to above case.  

Let me post some more information in the upcoming topics.

Tuesday, April 14, 2015

SQL Error: ORA-01940: cannot drop a user that is currently connected

SQL Error: ORA-01940: cannot drop a user that is currently connected
01940. 00000 -  "cannot drop a user that is currently connected"
*Cause:    Attempt was made to drop a user that is currently logged in.
*Action:   Make sure user is logged off, then repeat command.


Issue: When I am trying to drop a user from Oracle database, I am getting the above error though my application is in stopped stated which uses this schema. 
 Basically I am not a DBA to find out SID and SERIAL number and issue command to kill the session.

Solution: Use "Oracle SQL Developer" if you already having it. It is very simple and quick process. I will demonstrate how to achieve this. Just follow below steps.

 We can kill user session with SQL Developer option.


Step 1: Login to SQL Developer with system user account or any other user who are having DBA privileges and try dropping a user.


Step 2: Go to Tools -> Monitor Sessions.

SQL Developer Tools Monitor Sessions

Step 3: Select your database connection from the drop down list.

Select your database connection

Step 4:It displays all user session which are active.

List user sssions

 Step 5: Select the user session you want to kill and click "Apply" button to kill the session.


Kill session prompt

 Step 6: You will get the below confirmation message.

 
 This demonstration is intended only for testing or demo environments who are learning the technology and not for advanced users and DBA.

Monday, April 13, 2015

DOM_10215 Node is already running in domain

com.informatica.isp.corecommon.exceptions.ISPHardException: [DOM_10215] Node [node01_infoserver] is already running in domain [DOMAIN_INFOSERVER] at [biserver:6005].

Issue: My current project involves maintaining multiple Informatica servers like DEV, SIT, UAT and PROD. Mostly every month cloning activity will happen. So as part of this activity, DBA(Database Administrators) people clone some schema  from PROD database to rest of the databases.

 Ex:-  a) INFODOM (Informatica domain schema)
             b) INFOREP (Informatica repository schema)

 Basically they are taking the above schemas backup in ONLINE mode from PROD environment and placing them and restoring them in DEV(for example).

No need to mention, they obviously revert previous DEV database passwords.

Somehow, after restoring or cloning the Informatica schema, we are not able start Informatica services in DEV environment and when we verify the log(exception.log) from the below path.

D:\Informatica\9.0.1\logs

And getting the below error.

"FATAL [Domain Monitor] [DOM_10215] Node [node01_infoserver] is already running in domain [DOMAIN_INFOSERVER] at [biserver:6005]."

 We have spent lot of time to resolve this issue. But no luck, we haven't find exact solution to fix this issue. But alternatively we found some workaround.

Solution: Stop PROD Informatica services and try to start DEV Informatica services. Once the services are up and running try to update passwords and Database details. Finally start PROD Informatica services.

You are done.

Viewers inputs are highly appreciated if they can provide some inputs or resolution.

Currently I am doing some research on this issue, I can come with solution soon.

Friday, February 6, 2015

Backup Informatica repository with pmrep command

 Today I ran into a tricky situation where Informatica administrator(Admin console) page is not coming up. But repository service and integration service are running fine. I have verified this information by connecting to Informatica client tools.

 Now I have to take Informatica repository backup. How to get rid of this situation...!

 So here is an alternative way to take repository backup.

use pmrep utility.

Step 1: Open command prompt and type pmrep.


 Step 2: Enter the below command.  
 
connect -r Info_Rep -n Administrator -x Administrator -h etlserver -o 6005 

-r Repository name
-n Informatica username
-x Password
-h Host name
-o Repository port number

Change the values according to your environment.

pmrep_connected
 

 Step 3: Make sure you connect to the repository by checking the successful connect message.

 Step 4: Now perform repository backup using below command.

             backup -o Info_Rep_BKP.rep

 Step 5: It takes little to time complete the activity depending on size of your repository.
 
pmrep_repository_backup_completed


 Step 6: Go to Informatica server repository backup folder and verify your backup file.

repository_backup_file
 

Thursday, October 30, 2014

Reset Administrator password of DAC 10g

Issue: How to reset Administrator password in DAC10g(Oracle BI Data Warehouse Administration Console)

Solution: 

 There is no specific algorithm to decrypt DAC Administrator password which stored in W_ETL_USER metadata table of DAC.

 Searched many websites to get some solution and gone through the Oracle documents. But unfortunately no where I got the solution to reset the password.

 Here one interesting thing, DAC is also having others user accounts with "Developer", "Operator" roles. So I shouldn't mess existing user accounts to just reset the password.

 Let us look in to the trick now.

Step 1: Close DAC client.

Step 2: Take the W_ETL_USER table backup.

create table w_etl_user_bkp as select * from w_etl_user;

Step 3: Truncate the table W_ETL_USER.

truncate table w_etl_user;

Step 4: Open DAC client and try to login with below credentials

User name: Administrator
Password:   Administrator

Step 5: Now this will ask you to give new Administrator password. Just enter new password.

Step 6: Finally we will insert remaining users and their details from the backup table.

 insert into w_etl_user select * from w_etl_user_bkp where username!='Administrator';

 commit;

 Now you have the new Administrator password along with existing user accounts.


Wednesday, October 1, 2014

DAC10g to DAC11g upgrade


 In this post we will discuss Step by step Configurations to upgrade DAC10g version DAC11g.

Note: Upgrading to DAC 11g involves upgrading the DAC platform and repository, and then performing post upgrade tasks.

 Assumptions

•  DAC 10g version was already installed and running.
•  We are just upgrading the DAC platform from 10g to 11g compatible.

High level steps to upgrade

a) Perform DAC10g repository backup.
b) Install DAC11g.
c) Use the DAC11g Client to connect to the existing repository.
d) Perform the post upgrade tasks.

a) Perform DAC10g repository backup.

 i) Login to DAC10g with Administrator user credentials.

 ii) From the file menu go to "Tools" -> "DAC Repository Management"->"Export"

 iii) Select all the containers and select "Logical", "Run Time", "System" and "User Data".

 iv) Modify "Change import/export folder" to different folder than the default one.

b) Install DAC11g.

i)  Assuming DAC11g was installed already.

c) Use the DAC11g Client to connect to the existing repository.

i) Log in to the DAC 11g Client with Administrator user credentials, and make sure you select Authentication Type as "DAC".

ii) It will prompt to upgrade the repository, click Yes.

iii) This process will take several minutes. When the process is complete, the DAC Client will open.

iv) Now you should be able to see DAC10g metadata content in DAC11g format.

d) Perform the post upgrade tasks.

i) Configure the DAC repository to allow DAC Server connections.

ii) Configure connection between the DAC Server and repository.

Thursday, September 18, 2014

DAC 11g code migration information tabs

 In this post, we will discuss about the created patch and applied patch information.

 When you create a DAC metadata patch or apply a patch, this information will be stored in DAC setup tab for future references.

Created patch:

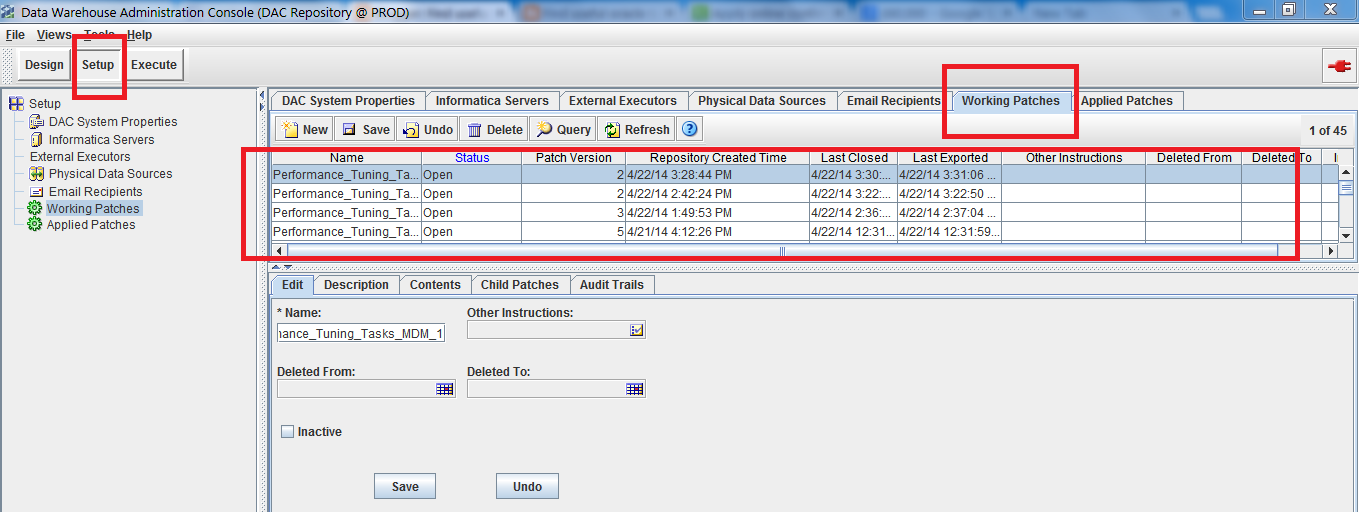
 Created patches will be stored in DAC -> Setup -> "Working Patches" tab.

DAC Metadata_working patches tab

 In this tab, you will get the information about, when the patch created,what are the contents in it, its status and last exported time.


Applied patch:

 Applied patches will be store in DAC -> Setup -> "Applied Patches" tab.

DAC Metadata_applied_patches tab


 In this tab, you will get all the applied patches information, what patches were applied and its status.

Tuesday, September 16, 2014

DAC metadata patch failing with errors

  I was working on creating DAC metadata patch to migrate subset of code to another environment. Previously i could migrate it successfully. But due to some mistake that I have done while creating patch produces below error message while applying the patch in another environment.

 So I created a patch again correctly and could resolve this issue.

1) , of table W_ETL_SA_STEP is not added or updated to repositoryMESSAGE:::Subject Area Task - Link must have [Task]
EXCEPTION CLASS::: com.siebel.analytics.etl.api.exception.RequiredPropertyMissingException

com.siebel.analytics.etl.api.object.SAStepObject.checkForRequiredProps(SAStepObject.java:157)
com.siebel.analytics.etl.api.object.BaseAPIObject.persist(BaseAPIObject.java:375)
com.siebel.analytics.etl.api.object.BaseAPIObject.persist(BaseAPIObject.java:296)
com.siebel.analytics.etl.inc.objects.IncXMLReader$PersistInfo.persist(IncXMLReader.java:1941)
com.siebel.analytics.etl.inc.objects.IncXMLReader$CurrTableInfo.persistCurrentObjects(IncXMLReader.java:2166)
com.siebel.analytics.etl.inc.objects.IncXMLReader$CurrTableInfo.addObject(IncXMLReader


2) , of table W_ETL_SA_STEP is not added or updated to repositoryMESSAGE:::persists error: null STEP_WID is not specified!
Can't update a record!
EXCEPTION CLASS::: com.siebel.analytics.etl.api.exception.BaseAPIException

com.siebel.analytics.etl.api.object.BaseAPIObject.persist(BaseAPIObject.java:405)
com.siebel.analytics.etl.api.object.BaseAPIObject.persist(BaseAPIObject.java:296)
com.siebel.analytics.etl.inc.objects.IncXMLReader$PersistInfo.persist(IncXMLReader.java:1941)
com.siebel.analytics.etl.inc.objects.IncXMLReader$CurrTableInfo.persistCurrentObjects(IncXMLReader.java:2166)
com.siebel.analytics.etl.inc.objects.IncXMLReader$CurrTableInfo.addObject(IncXMLReader.java:2126)
com.siebel.analytics.etl.inc.objects.IncXMLReader.createAPIObjectNew

3)

createAPIObject fails with error: null, container id =,Oracle 11.5.10EXCEPTION CLASS::: com.siebel.etl.gui.core.NewRecordCreationException

com.siebel.analytics.etl.client.data.model.ResultSetParser.createNewRecord(ResultSetParser.java:203)
com.siebel.analytics.etl.client.data.model.UpdatableDataTableModel.createNewRecord(UpdatableDataTableModel.java:98)
com.siebel.analytics.etl.client.data.model.DACTableModel.createNewRecord(DACTableModel.java:326)
com.siebel.analytics.etl.api.object.BaseAPIObject.persist(BaseAPIObject.java:361)
com.siebel.analytics.etl.api.object.BaseAPIObject.persist(BaseAPIObject.java:296)
com.siebel.analytics.etl.inc.objects.IncXMLReader$PersistInfo.persist(IncXMLReader.java:1941)
com.siebel.analytics.etl.inc.objects.IncXMLReader

Friday, September 12, 2014

Export Multiple Informatica workflows from different folders as single xml file

 Export Multiple Informatica workflows from different folders as single xml file

 I am sharing a technique where you can export multiple Informatica workflows from different folders. Usually you can export workflows from one folder at a time. But sometimes you need to export it as one xml file and this is not possible with regular approach. 

So for those people who got this requirement just follow this steps.

 I have already explained Usage of Informatica Query option, so by making use of this option we will complete this export activity.

Step 1: Create a query such that i will list out all the required workflows from different folders.


Informatica query tool for different workflows

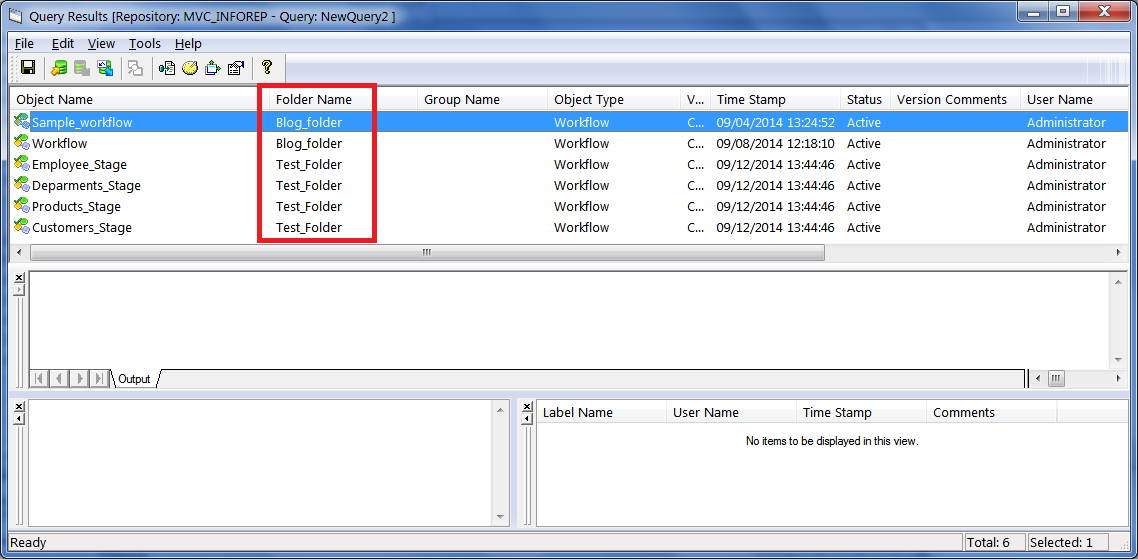
Step 2: Execute the query to create the output. You will see the output with workflows from different folders as marked in red color in the below image.

Informatica query tool for different workflows list

Step 3:  Use ctrl(key) to select all the workflow and do right click on it and select "Export to XML file" option.

Informatica query tool for different workflows list export

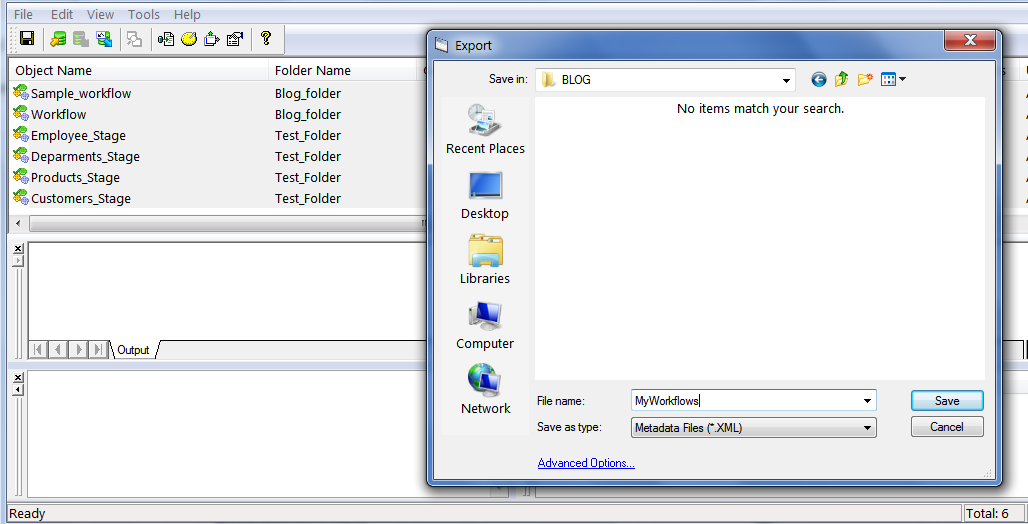
Step 4: Now you can save all the workflows as single xml file from different workflows.

Informatica query tool for different workflows list export save

Related links:


Tuesday, September 9, 2014

./nqcmd: error while loading shared libraries: libARicu23.so:

 In this post I am going to explain how to use "nqcmd" command line utility in Linux environment.

Please follow the same steps as mentioned. Otherwise the while invoking nqcmd utility you will face some library file error issue.

./nqcmd: error while loading shared libraries: libARicu23.so: cannot open shared object file: No such file or directory

 As oracle says, to use nqcmd utility, we have to run "bi-init.sh" which initializes Oracle Instance. This file will be available in the below path.

 /OBIEE/app/fmw/instances/instance/bifoundation/OracleBIApplication/coreapplication/setup/

Step 1: Open putty and connect to the linux server and then change directory to the below path.(Path may be different according your environment)

cd /OBIEE/app/fmw/instances/instance/bifoundation/OracleBIApplication/coreapplication/setup/

Step 2: Run bi-init.sh file exactly as below.

. ./bi-init.sh

Note: First dot space and second dot and immediate backslash.

Step 3: Now change directory to the below path

cd /OBIEE/app/fmw/Oracle_BI1/bifoundation/server/bin

Step 4: Execute the nqcmd with below command and without any error it will invoke.

[obiee@obieedevlinux bin]$ ./nqcmd

 Here the Important step is Step 2: to set Oracle Instance.

Download OBIEE 11g server logs from Enterprise manager

 When we face some trouble in OBIEE 11g, we always search for the log files to find out the cause. 

Examples of log files are 

 1) Presentation Services log (sawlog.log)
 2) Server log (nqserver.log & nqquery.log)
 3) Schedule log (nqscheduler.log)
 4) JavaHost log (jh.log)
 5) Cluster Controller log (nqcluster.log)

 6) OPMN log (opmn.log)

 To get/view this files either you have to connect to the server using ssh(putty) or filezilla(ftp). Sometime you will not have server login passwords. So in this case getting these files are very difficult. 

 Here is the tip to download the above log files directly from OBIEE 11g Enterprise manager.

Step 1: Login to EM.

Weblogic EM Login

Step 2: Right click on the "bifoundation_domain", then "Logs" and select "View Log Messages".

weblogic EM log files

Step 3: You will see the log files screen as below.

weblogic EM target log files

Step 4: Expand "Selected Targets" as shown below and you will see the log files here.

weblogic EM target logs expand

Step 5: Then select desired server log and click on the "view log file" ( Marked with red color in the screenshot).

weblogic EM BI Server log example

Step 6: Here you can either view the required log or you can directly download the entire log file in to your local machine.

weblogic EM BI Server log download

 Similarly you can follow the same steps for downloading other log files also.

Monday, August 25, 2014

Why DAC 11g(Oracle BI Data Warehouse Administration Console) synchronization fails

 People who are working on DAC(Oracle BI Data Warehouse Administration Console), for the first time face this issue. Below are the exact points which will resolve the problem.

 In this post, you will get an explanation of why DAC 11g(Oracle BI Data Warehouse Administration Console) synchronization fails.

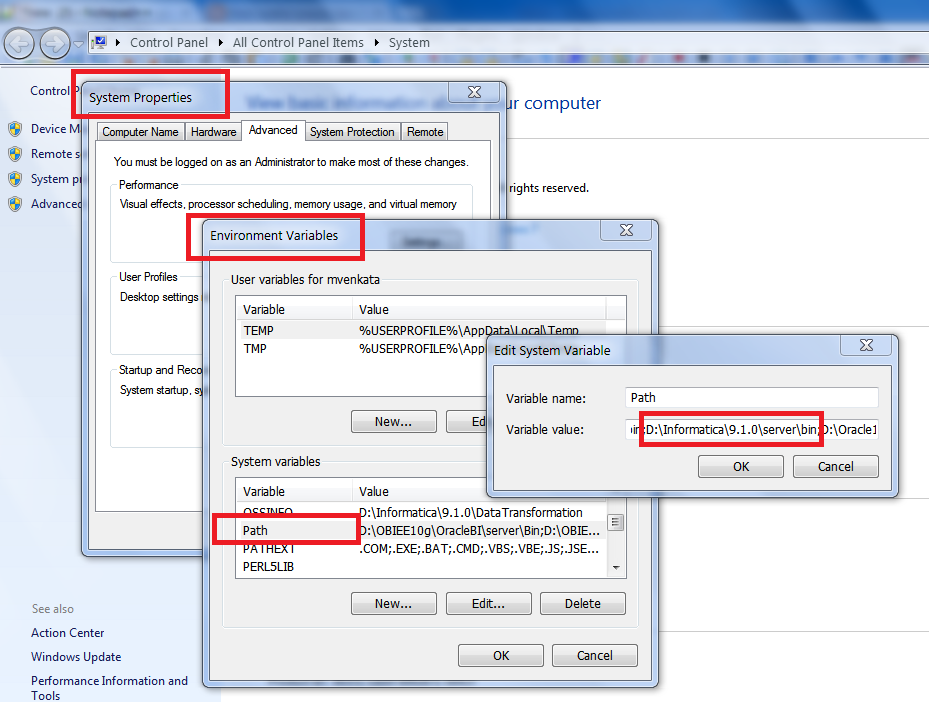
  1) If, PATH environment variable is not set for pmrep and pmcmd.
  2) If DAC installation directory contains spaces.(space character)
  3) Infa_int and Infa_rep connection should be successful.


1) If, PATH environment variable is not set for pmrep and pmcmd.

      
PMREP and PMCMD Path evnironment variable

D:\%SystemRoot%\system32;%SystemRoot%;%SystemRoot%\System32\Wbem;%SYSTEMROOT%\System32\WindowsPowerShell\v1.0\;C:\Program Files (x86)\Intel\OpenCL SDK\3.0\bin\x86;C:\Program Files (x86)\Intel\OpenCL SDK\3.0\bin\x64;D:\Informatica\9.1.0\server\bin;D:\Oracle11g\app\mvenkata\product\11.2.0\client_1\bin;C:\Program Files (x86)\Lenovo\Access Connections\;C:\Program Files (x86)\Common Files\lenovo\easyplussdk\bin


Symptom: Without the above environment variable, pmcmd and pmrep will not invoke as below.

pmcmd and pmrep is not recongized

  So after setting up the above environment variable close the command prompt and open it again. Verify pmcmd and pmrep commands as below. It will invoke as below.

pmcmd and pmrep is invoked


2) If DAC installation directory contains spaces.(space character)

 C:\Program Files (x86)\Oracle Business Intelligence Data Warehouse Administration Console 11g

  If the DAC installation directory contains space character as mentioned above, while doing synchronizing the tasks you will simply get a window saying "success". But the source and target tables will not be added to the tasks.

 But when you debug the issue, you will be stopped here.

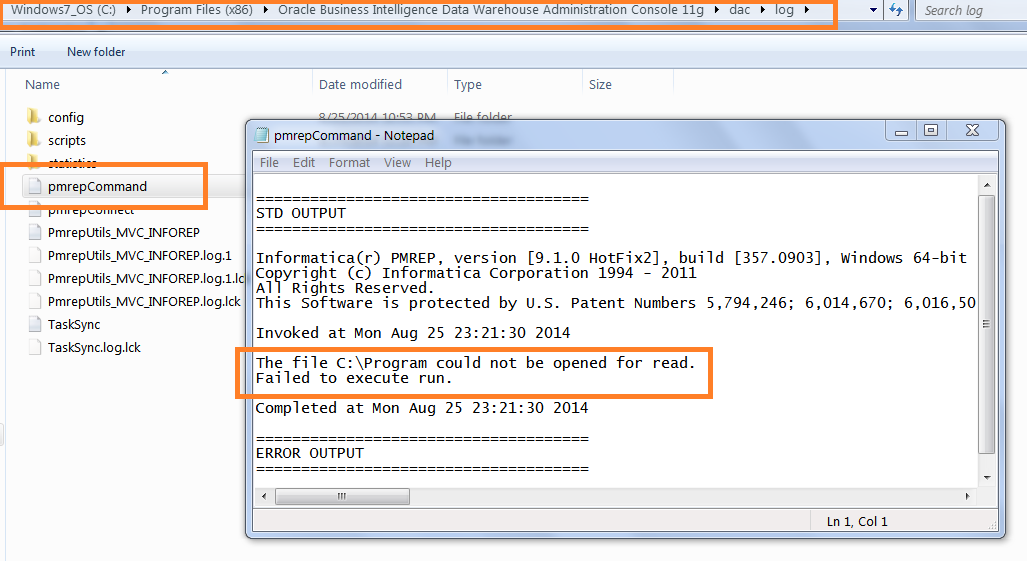
file could not be read error

 With the error "C:\Program could not be opened for read.", we can say that, DAC is not able to read the file after space found.

 So make sure your installation directory should not contain any spaces.

3) If Infa_int and Infa_rep connections are not successful.

 Make sure the connections are successful that we create "SETUP" tab, "Informatica servers" tab.


infa_int connection successful

infa_rep connection successful

Related links:


Sunday, August 24, 2014

Full DAC Metadata or Repository tables part 3

Part 3: System Tab related metadata tables:


Execute tab highlight


 In this post you will get more information about Execute tab related metadata tables of DAC(Oracle BI Data Warehouse Administration Console).

1) All execution plans     -    W_ETL_DEFN

    a) Subject areas associated to the EP    -  W_ETL_DEFN_SA
    b) Tables belongs to the EP                 -  W_ETL_DEFN_TBL
    c) All tasks involved in the EP              -   W_ETL_DEFN_STEP 
    d) Connectivity parameters for this EP   - W_ETL_DEFN_PRM

2) Current Run / Run History -   W_ETL_DEFN_RUN

    a) Task belongs to the EP                  -   W_ETL_RUN_STEP
    b) Details for a tasks in EP                -  W_ETL_RUN_SDTL
    c) Audit trial (No.of time EP restarted) -  W_ETL_RUN_AUDIT
    d) Phase summary                            - W_ETL_RUN_STEP
    e) Run type summary                       -   W_ETL_RUN_SDTL

3) EP Schedule information           -  W_ETL_SCHEDULE

Related links: 

DAC Metadata or Repository tables part 2

DAC Metadata or Repository tables part 1

Full DAC Metadata or Repository tables part 2


Part 2: System Tab related metadata tables:


System tab highlight


 In this post you will get more information about system tab related metadata tables of DAC(Oracle BI Data Warehouse Administration Console).

1) DAC system properties    -  W_ETL_SYSPROP

2) Informatica servers         -  W_ETL_SERVER

3) All Physical data sources  - W_ETL_DBCONN

  a) Tables associated to Physical data souce and its "Refresh dates" information                       -    W_ETL_REFRESH_DT

4) E-mail recipients           -  W_ETL_EMAIL

5) Working patches           - W_ETL_PATCH

(Patches created information will be stored here. 

   a) Patch content            -  W_ETL_PATCH_DATA
   b) Child patches            -  W_ETL_PATCH_CHILD

6) Applied patches           -   W_ETL_APATCH

   a) Applied patch content           -  W_ETL_APTC_DATA
   b) Applied child patches            -  W_ETL_APTC_CHLD
   c) Deleted objects by this patch - W_ETL_APTC_DEL

Related links:

DAC Metadata or Repository tables part 1

DAC Metadata or Repository tables part 3


Full DAC Metadata or Repository tables part 1


Part 1: Design Tab related metadata tables: 


Design tab highlight


 In this post you will get more information about design tab related metadata tables of DAC(Oracle BI Data Warehouse Administration Console).

1) All Containers          -  W_ETL_APP
2) All User accounts     -  W_ETL_USER
3) All Subject areas      -  W_ETL_SA
  
   a) All task related to subject area     - W_ETL_SA_STEP
   b) All tables related to subject area   - W_ETL_SA_TABLE

4) All Tables               -  W_ETL_TABLE

   a) All columns for a table                 -  W_ETL_TABLE_COL
   b) All indexes associated for table     -  W_ETL_INDEX
   c) All source/Target for a task           -  W_ETL_STEP_TBL

5) All Indexes             -  W_ETL_INDEX

   a) Columns associates to a index    - W_ETL_INDEX_COL

6) All Task groups       - W_ETL_STEP
  
   a) Associates child tasks - W_ETL_GROUP_STEP

7) All Tasks                -  W_ETL_STEP
   
   a) All Source/Target tables associates to tasks - W_ETL_STEP_TBL
   b) Task associated to a subject areas             -  W_ETL_SA_STEP

8) All Configuration Tags - W_ETL_TAG

   a) All subject areas associated to this CT     -    W_ETL_TAG_SA
   b) All tasks associated to this CT                -    W_ETL_TAG_STEP

9) All source system parameters   -   W_ETL_PARAM

10) All source system folders       -   W_ETL_PARAM

11) Container specific SQL           -   W_ETL_APP_TMPLT

Related links:

DAC Metadata or Repository tables part 2

DAC Metadata or Repository tables part 3


Friday, August 22, 2014

Listing Informatica objects with Query Tool

Issue: List all Informatica objects(Mappings, Sessions, Workflows etc)

Solution: Use inbuilt "Queries" option in Informatica Powercenter Repository Manager tool.

Some of the uses of this "Queries" option.

a) Create list of objects such as Mappings, sessions, workflows etc.
b) Objects with their status( Valid or Invalid).

 In this post I will get the list of workflows in a particular folder using this option. Below are the steps to carryout this activity.

Step 1: Login to "Informatica Powercenter Repository Manager".


Step 2: From the file menu, go to "Tools" and select "Queries".

Tools and Queries option

Step 3: From the file menu, go to "Tools" and select "Queries".

Click New button to create a query

Step 4: Click on the "New" button to create a query and start composing a query like this.

Note: - Use  these button to create a query.

Query window


Step 5: Click on the "Execute" button to list the required objects and the output will be displayed as below.

Objects list output with informatica query tool

Step 6: Click on the "Save" button to save the list. You can later process this data in to an Excel sheet.

Save output list

Related links: